First, you're going to need the
Shoes! add-on, so get that in the add-ons shop before following this tutorial.
You will need:- GIMP (FREE image editing program from http://www.gimp.org/) or...
- Photoshop (not required but VERY useful) and...
- Notepad or a good text editor like TextPad.
Aside from being able to use graphic editing programs you will need to know how to open Windows Explorer and work with files and folders.
Ok, let's do it...
Misc Files:There are three files that every pair of shoes needs.
1. The shoes texture. This is the main texture that determines what your shoes look like.
2. An info file. This is a text file with an XML extension. Here's an example:
<?xml version="1.0" encoding="UTF-8" ?>
<Unit>
	<Shoes>
		<Name>Black Peekaboo</Name>
		<Description>NA</Description>
		<Author>Ripened Peach</Author>

		<Category>shoes</Category>
		<Type>1</Type>

		<Shine>3</Shine>

		<HeightOffset>0.08</HeightOffset>
	</Shoes>
</Unit>
The info file has what are called "tags" and each tag has a purpose. To use a tag you just put whatever info it needs in between the > and the <. The breakdown of what each tag is for is:
- <Category> : This is the category the layer item appears in in the Extras menu. In this case it is of course "shoes"
- <Author> : This is you.
- <Type> : This is the style of shoe you want to use. There are currently 5 styles to choose from.
- <Shine> : This is the type of material surface you want.
- <HeightOffset> : This is the standing height offset when the girl is wearing these shoes. You won't really need to use this as it's more of an internal value.
3. A thumbnail image. This is the picture that shows in the shoes menu for picking out the shoes you want.
Painting the Textures:You can paint your textures in any suitable graphics editing program like Photoshop, Painter, GIMP, whatever you like, as long as it can save out PNG files with transparency.
The wireframe shell model for a shoe uses what's called a UVW map in order to properly place the painted texture on it.
Here are the UVW maps for each of the five styles of shoe (shoe style shown on thumb for reference):
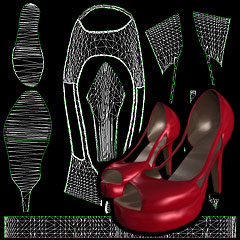
Shoes Style 1 UVW (click for larger) | 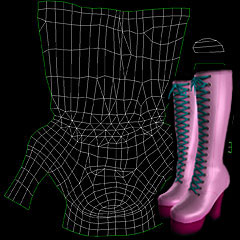
Shoes Style 2 UVW (click for larger) | 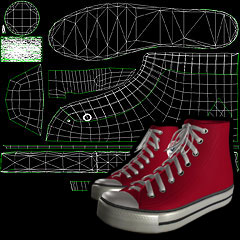
Shoes Style 3 UVW (click for larger) |
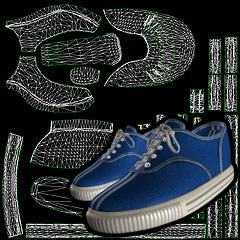
Shoes Style 4 UVW (click for larger) | 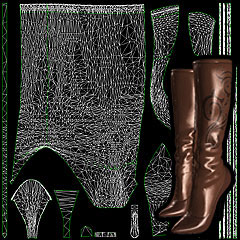
Shoes Style 5 UVW (click for larger) |
You will want to download the larger version of the UVW image as it will make texture painting much easier. You can load it into a layer in your paint program and use it as a template to work with.
Please load some of the existing shoe textures into your image editing program to get an idea of how they work. That will give you a good idea of where everything goes on each texture.
Setting the Material Type:You can choose from 4 different material types for your shoes to use. Just put the number from below between the "Shine" tags in the XML file:
0. Matte
1. Semi Shiny
2. Shiny
3. Super Shiny
Shoe types 1 and 5 have an additional material type, "Snakeskin", which can be used by entering '4' into the Shine tags. This will only work on shoe types 1 and 5, though, and gives them a snakeskin bump map.
So for example, let's say I want super shiny shoes, then the Shine tags would look like this:
<Shine>3</Shine>Where to put stuff:Ok, so you've got your textures painted and you want to see them in the sim.
Here's where it all goes:
The shoe texture:
Runtime\user_created\shoes\The info XML file:
Runtime\user_created\shoes\info\The thumbnail image:
Runtime\user_created\shoes\thumbs\ (the thumbnails need a "tn_" in the beginning of the filename - see the ones that come with the pack for details).When you name the files, you might want to put your nick name or some tag in the file name like this:
jak_Awesome-Shoes.xml - That way if you make something that has the same name as one someone else made, they won't over-write each other.
Make sure those files are in those folders and then start the sim. Log in and go to the Extras\Shoes tab. You should be able to find your shoes in there. Click them and check it out!
Some Tips:You most likely will have to keep checking your progress as you go, and there's no need to keep logging in and out of Sex Sim to do it. Just hit Go to see the shoes on the girl, do some work in your graphics editing program, save the textures, then hit ESCAPE to go back to the main menu. Your new textures will load up when you choose your shoes again (you might have to click on another item then yours again to reset it).
Another way to quickly see what you're working on is to use the new TAB viewer. Click the Girls tab on the menu, then hit the TAB key on your keyboard. That method may be quicker than dipping in and out of the sim.
An easy way to work on shoes is to create a file called "TempShoes" in Photoshop or whatever. Then, copy one of the existing shoes' xml info files and rename it to "TempShoes.xml". Now, when you save your PNG file while working, save it as "TempShoes.png" and that will be your working file. There's no need to even make a thumbnail just yet as Sex Sim will just use a default one until you do. When you're finished working then just save things as normal to the name you want and that's that. That way you always have a quick way to just jump in and start working on new shoes without having to keep making the initial files all the time.