This tutorial will show you how to make your own custom outfits from scratch for use in Sex Sim.
You will need:- GIMP (FREE image editing program from http://www.gimp.org/)
- Photoshop (not required but VERY useful)
- Notepad or a good text editor like TextPad.
Aside from being able to use graphic editing programs you will need to know how to open Windows Explorer and work with files and folders.
Ok, let's do it...
Clothing Shells:Sex Sim uses what we call a "shell" for outfits. Basically it's a 3D model with a texture applied to it. That shell is what you see in the game as clothing, even though it doesn't look like it.
Below are two renders of Robyn. In the first one, you can see what the shell looks like behind the scenes. In the second, you can see what it looks like when the 3D wireframe is turned off.
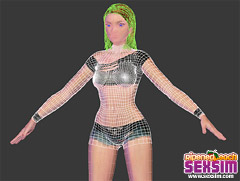
Clothing shell wireframe (click for larger) | 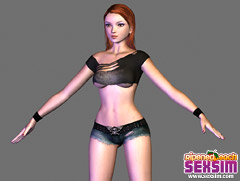
Clothing shell rendered (click for larger) |
There are two types of shell we use in Sex Sim. One is called "
regular" and it's used for things like t-shirts, suspenders, and basically anything that hangs down loosely over the breasts. The other is called "
tight" and it's for things like bras, bikinis, and other types that cling and cup under the breasts. The shell shown in the shots above is the "regular" one, and if you look closely under Robyn's right breast you can see that the shell doesn't cling too tightly.
Textures:Every outfit in Sex Sim is made up of three textures. A typical set of outfit textures would be set up like the following:
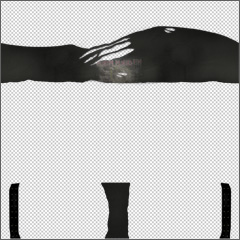
Metal-Maiden_r-t.png (click for larger) | 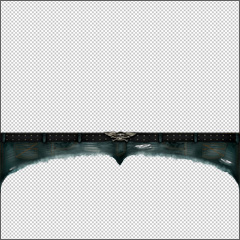
Metal-Maiden_r-b.png (click for larger) | 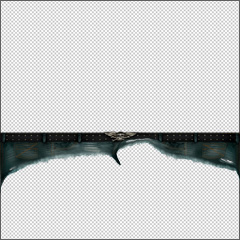
z_Metal-Maiden_r-b.png (click for larger) |
The file names follow this convention:
1. Each outfit has a name, such as "Metal-Maiden". Anywhere there would be a space in the name you should use a hyphen (-).
2. Directly after the name you should use an underscore followed by the type, which is either an "r" or a "t". The "r" is if you are making a "regular" style outfit (see the notes on shells) and the "t" is for if you are making a "tight"style.
3. Following the type designation is a hyphen and a the letter "t" for "top" or "b" for "bottom". I'm pretty sure you can figure out what those mean.
4. The third texture is a special one. It's a "bottom" texture but it has a "z_" in front of the name. This tells Sex Sim that this is the "pulled" texture for the bottom. What's "pulled"? It's for when you leave the bottom on the girl while she's in action, and it appears as if the cloth is pulled over to allow access. In our example the cloth is pulled over but you can do anything with this texture like have it zippered all the way down, a hole cut out, whatever. It's up to your imagination.
Wherever you see the checkerboard pattern in those images the texture is "transparent". Sex Sim allows for a full range of transparency so you can do everything from barely see-through to fully transparent, with multiple types on each texture.
If you look closely on the images you'll also see a slight shadow around the clothes. This is good to do as it can make things look even more real by appearing to cast a shadow on the body around where the edges of the outfit are.
I'll cover the textures in more detail a little further down, but the point is that pretty much anything you can think of to paint in Photoshop or Gimp can be used on an outfit.
Other Files:There are two other files that every outfit needs.
1. A thumbnail image. This is the picture that shows in the main menu for picking out the outfit, like this:
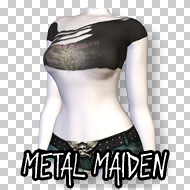 tn_o_Metal-Maiden.png (actual size)2.
 An info file. This is a text file with an XML extension. Here's an example:
<?xml version="1.0" encoding="UTF-8" ?>
<Unit>
	<Outfit>
		<Name>Metal Maiden</Name>
		<Description>NA</Description>
		<Category>Misc</Category>
		<Type>R</Type>
		<Order>0</Order>
		<Shader>0</Shader>
		<Author>Jayme</Author>
	</Outfit>
</Unit>
The info file has what are called "tags" and each tag has a purpose. To use a tag you just put whatever info it needs in between the > and the <. The breakdown of what each tag is for is:
- <Name> : Be creative!
- <Description> : Not currently used but might be at some point. Feel free to fill it in if you want.
- <Category> : This is the category the outfit appears in in the main menu. Misc, Intimates, or Swimwear.
- <Type> : This is the type we talked about above; R for "regular" and T for "tight". Make sure to capitalize!
- <Order> : Not currently used but may be in the future.
- <Shader> : Not currently used but may be in the future.
- <ExtraLimbs> : You can specify stockings (or anything else that's an extra layer) that will load when this outfit loads. Just use the filename of the stockings, minus the extension... for example: 000_Stripey-Socks
- <Author> : This is you.
Painting the Textures:You can paint your textures in any suitable graphics editing program like Photoshop, Painter, GIMP, whatever you like, as long as it can save out PNG files with transparency.
The wireframe shell models use what's called a UVW map in order to properly place the painted textures on them. Here is what those look like:
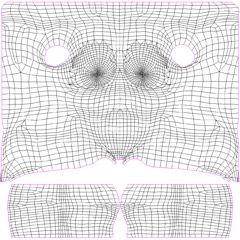
Clothing shell UVW : REGULAR (click for larger) | 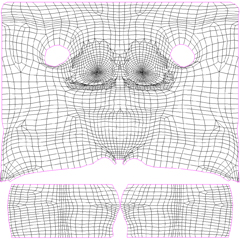
Clothing shell UVW : TIGHT (click for larger) | 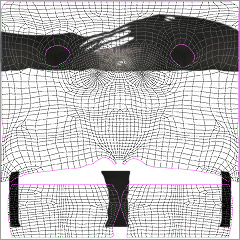
Clothing shell UVW : REGULAR EXAMPLE (click for larger) |
You probably want to download the larger versions of the first two images as they will make texture painting much easier. You can load them into a layer in your paint program and use them as a template to work with. The third image shows how the texture looks when overlayed with the shell UVW map.
In the images I showed in the "Textures" section, please note that anywhere you see the checkerboard pattern is transparent in the texture file. When you save your textures as PNG you will need to save them with the background layer turned off so that only the outfit part is showing and everything that needs to be transparent isn't.
Where to put stuff:Ok, so you've got your textures painted and you want to see them in the sim.
Here's where it all goes:
The info XML file:
Runtime\user_created\clothes\info\The top texture:
Runtime\user_created\clothes\The bottom texture:
Runtime\user_created\clothes\The "pulled over" bottom texture:
Runtime\user_created\clothes\The thumbnail image:
Runtime\user_created\clothes\thumbs\Make sure those files are in those folders and then start the sim. Log in and go to the clothes tab. You should be able to find your outfit in there. Click it and check it out!
You most likely will have to keep checking your progress as you go, and there's no need to keep logging in and out of Sex Sim to do it. Just hit Go to see the outfit on the girl, do some work in your graphics editing program, save the textures, then hit ESCAPE to go back to the main menu. Your new textures will load up when you choose your outfit again (you might have to click on another outfit then yours to reset it). Once we come out with the clothing tools it will be easier to check progress but that's how to do it for now.
Wrapping Up...I'll cover how to make a good thumbnail image and other tips tomorrow. Right now it's late and I'm tired so I'll call it a night. Until then, have fun.
